Looking after a Tower Clock
A tower clock is a feature of many parish churches in England. Although some date back to the Middle Ages, new clocks were often installed in the Victorian era when timekeeping became increasingly important and standardized, and a clock and its chimes were a public service to the community. All Saints’ Church, St Ives is no exception. Its clock was originally made by Gillett and Bland of Croydon in 1872, and restored in 1930 (when the bells were replaced following the 1918 plane crash that had demolished the spire and broken the bells). The firm, founded in 1844, is still trading as Gillett and Johnston, and continues to service the clock each year.
It’s a fascinating mixture of 19th-century precision engineering, late 20th-century electro-mechanics, and early 21st-century electronics that sits in a publicly inaccessible place near the top of the church tower. Very few people get to see it, but over recent years I have become quite familiar with the “old thing”, particularly when something goes wrong. I seem to have acquired the job of sorting out routine issues with the tower clock and chimes, which involves climbing up and down the tower to reset the time shown when it goes wrong, and to sort out the quarter and hour chimes when they go wrong. This article is something of an aide memoire or help page, documenting for myself and others how to adjust these things. It does not cover maintenance and servicing of the clock itself: this should be left to the professionals.
Contents
- Tower Safety
- Useful Tools
- Setting the Clock
- Putting the Clock Back (1)
- Putting the Clock Back (2)
- Putting the Clock Forward
- Adjusting the Quarter Chimes
- Adjusting the Hour Chimes
- If the Chimes are Jammed
- Disengaging and Engaging the Clock Chime Hammers
- The Tower Light
- Getting to the Clock Room
- Some History
- The Chimes
- Contact Details
- Disclaimer
Tower Safety
Steps at the top of the iron spiral stair leading to the bell chamber door. This is the only section without a handrail.
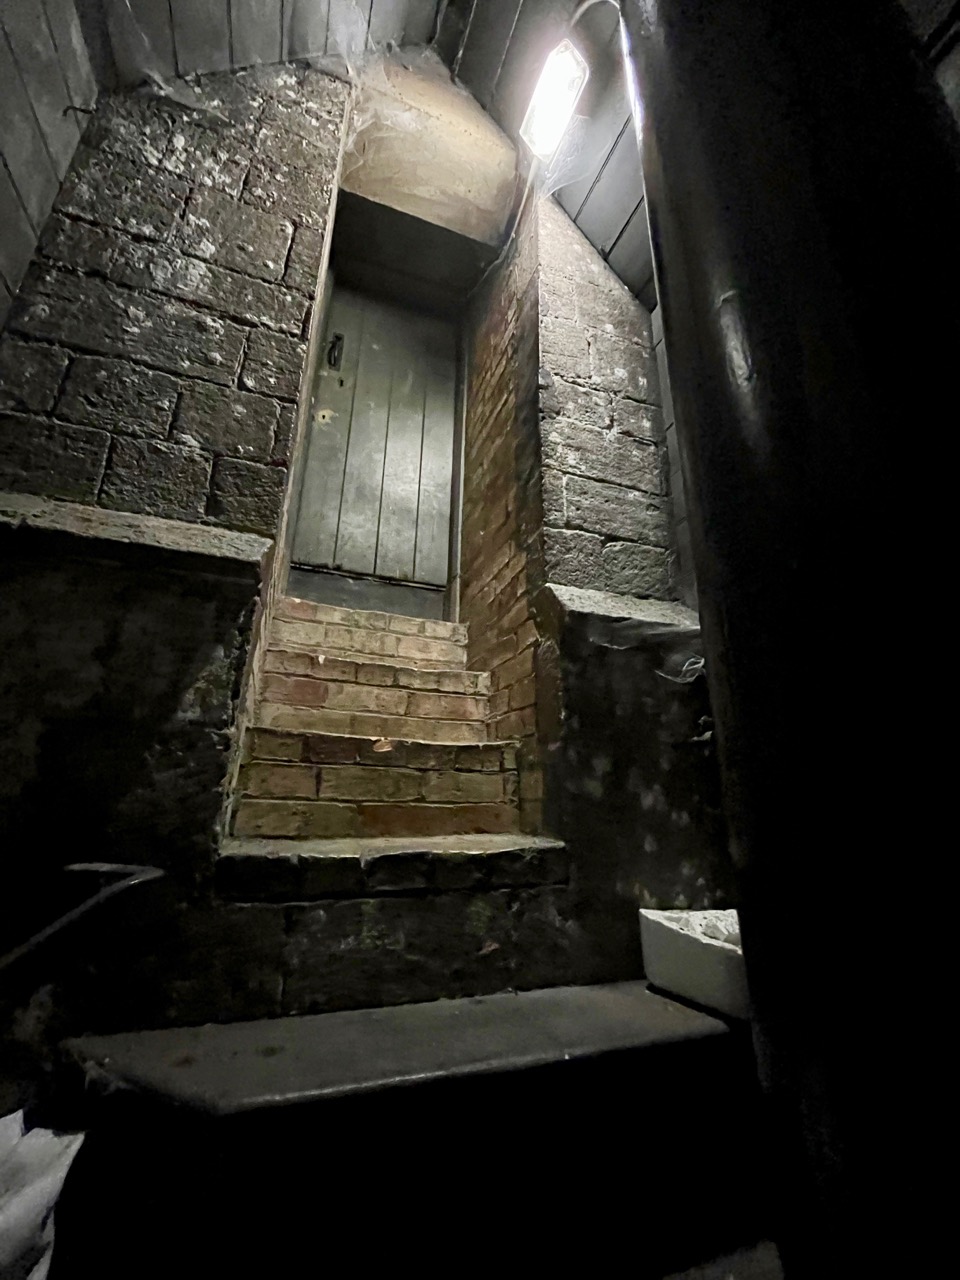
All but one of these tasks require access to the clock room at the top of the tower. To get to the clock room you must first climb the 40 or so steps of the iron spiral staircase, culminating in half a dozen brick steps into the bell chamber.
Once in the bell chamber there is then a further climb up the internal stone spiral staircase of another 20 steps, which takes you nearly to the top of the tower. You need to be reasonably fit and agile and not too worried about heights (though all heights are protected and safe, with just a short section of a few steps without a handrail).
Never climb up the tower without at least making sure that another responsible adult knows where you are and how long you are likely to be. Always take a mobile phone with you so that you can raise the alarm if necessary. Always turn the tower lights on before climbing (don’t forget to turn them off afterwards!).
Never enter the bell chamber unless you know that the bells are down. It is extremely dangerous – even potentially fatal – to enter the bell chamber if the bells are up (i.e., mouth up, rung up ready for ringing). If you do not know what this means and do not know how to safely check then you must not enter the bell chamber. Talk to the tower captain or another responsible ringer.
The bell chamber is filled with beams that are less than 6 feet above the floor, so there is not much headroom. There are also ropes for the Ellacombe Chimes that cross the chamber below the beams, further reducing the headroom, and there are a number of items on the floor which are something of a trip hazard.
These notes are no substitute for the church’s official policy document, nor for your own risk assessment.
Useful tools
- A mobile phone for contacting other people.
- An accurate watch or clock. The clock on a mobile phone is usually very accurate. It is useful to have one that displays seconds as well as hours and minutes. You may find the clock at crucix.com/clock helpful: this can easily be displayed in a web browser on your phone, and I wrote it for this purpose.
- A torch. The torch on a mobile phone is usually more than adequate. Although the tower and stairs are lit, a torch is useful for examining detail; there is also one darker spot on the upper stair where a torch can be helpful, especially when descending.
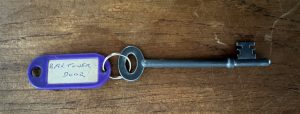
- The bell chamber key. You will need this to get into the bell chamber at the top of the spiral staircase, from where there is access to the staircase up to the clock level. If you don’t know where the key is kept then ask the tower captain or a churchwarden.
- A small flat-headed screwdriver, for accessing the electronic clock control. A suitable screwdriver is kept in the clock room.

Additionally, for some tasks a second person is helpful, particularly when you want to check what time is shown on the external clock face, while you are up the tower in the clock chamber.
Setting the clock
The radio control should automatically correct itself when the clocks are put forward one hour at the end of March and back one hour at the end of October. If it is wrong at other times, for example if there has been a break in the electricity supply, it will need correcting.
Depending on the deviation from the correct time the clock can be moved forwards or backwards – except that it cannot be wound back, only stopped, whereas it can be wound forward at 10 times normal speed. So it is usually quicker to advance the clock: if it is more than about 80 minutes fast then it is quicker to wind it forwards (the break-even point is about 72 minutes, but you’ll also have to climb up and down the tower, probably twice, since you have to be up in the clock room to wind the clock forward). On the other hand, stopping and restarting the clock can be delegated to another person with very little instruction needed.
If the clock and the chimes are both wrong, then put the clock right first, leaving the chimes disabled. Once the clock is showing the correct time then you can sort out the chimes.
Putting the clock back (1)
If the clock is slightly fast then it will need to be put back. This is achieved by stopping the clock until reality catches up with the time on the clock face!
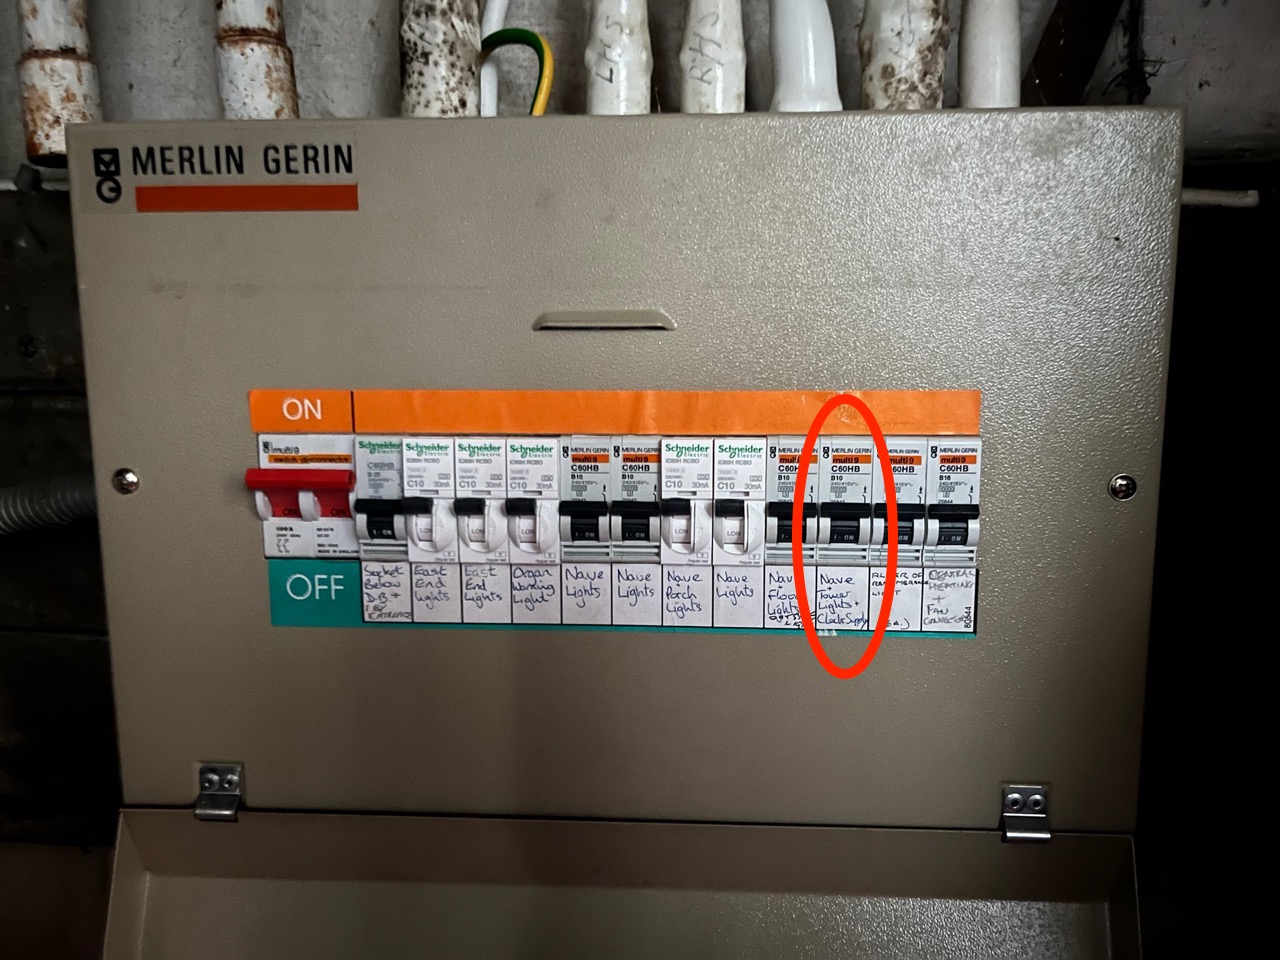
Although the clock can be stopped from the clock room at the top of the tower, it is also possible to stop it by turning off the power supply, which can be done from the switchbox at the bottom of the tower.
- Go outside and check the time shown on the clock faces. Work out how long you will need to stop the clock for. (Or: you will need to wait until the time shown on an accurate timepiece matches the time shown on the stopped clock face.) You might want to be ready to stop the clock at an exact hour, if that makes the arithmetic easier.
- Open the cupboard by the spiral staircase at the north-west end of the church.
- Locate the switchbox and open it
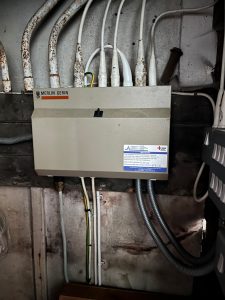
- Identify the switch that controls the clock and tower. It’s the third switch from the right labelled “Nave + Tower Lights + Clock Supply”. Double-check you have the right switch!

- Flick the switch down to the “off” position.
- Wait until the clock is showing the right time, and then flick the switch back up to “on”.
- Close the switchbox.
- Close and latch the cupboard door.
- Go outside and check the time shown on the clock faces.


If the clock needs to be stopped for a considerable period then you may find it helpful to restart it a few minutes before the calculated time, so that you can go outside and recheck the time it shows. Doing this is much easier than overshooting so that the clock is slow and you must advance it, which requires climbing the tower, or alternatively stopping the clock for nearly 12 hours.
The chimes will not sound when the clock is stopped, so you do not need to worry about disabling them.
Putting the clock back (2)
The clock can also be stopped from the clock room. I’ll cover this below.
Putting the clock forward
The clock can only be moved forward using the controller in the clock room at the top of the tower. If you are advancing the clock by a significant amount it is helpful to have a companion who will stay outside the church and let you know when the clock is right. You will need to exchange mobile phone numbers! Make sure you have read the Tower Safety notes. You should not climb the tower if the bells are up. You should not climb the tower without telling someone else.
- Go outside and check the time shown on the clock faces. Compare it with an accurate clock and note exactly how much it needs to be advanced. Double-check your calculation!
- Disengage the chiming hammers – see here.
- Go up to the clock room – see here.
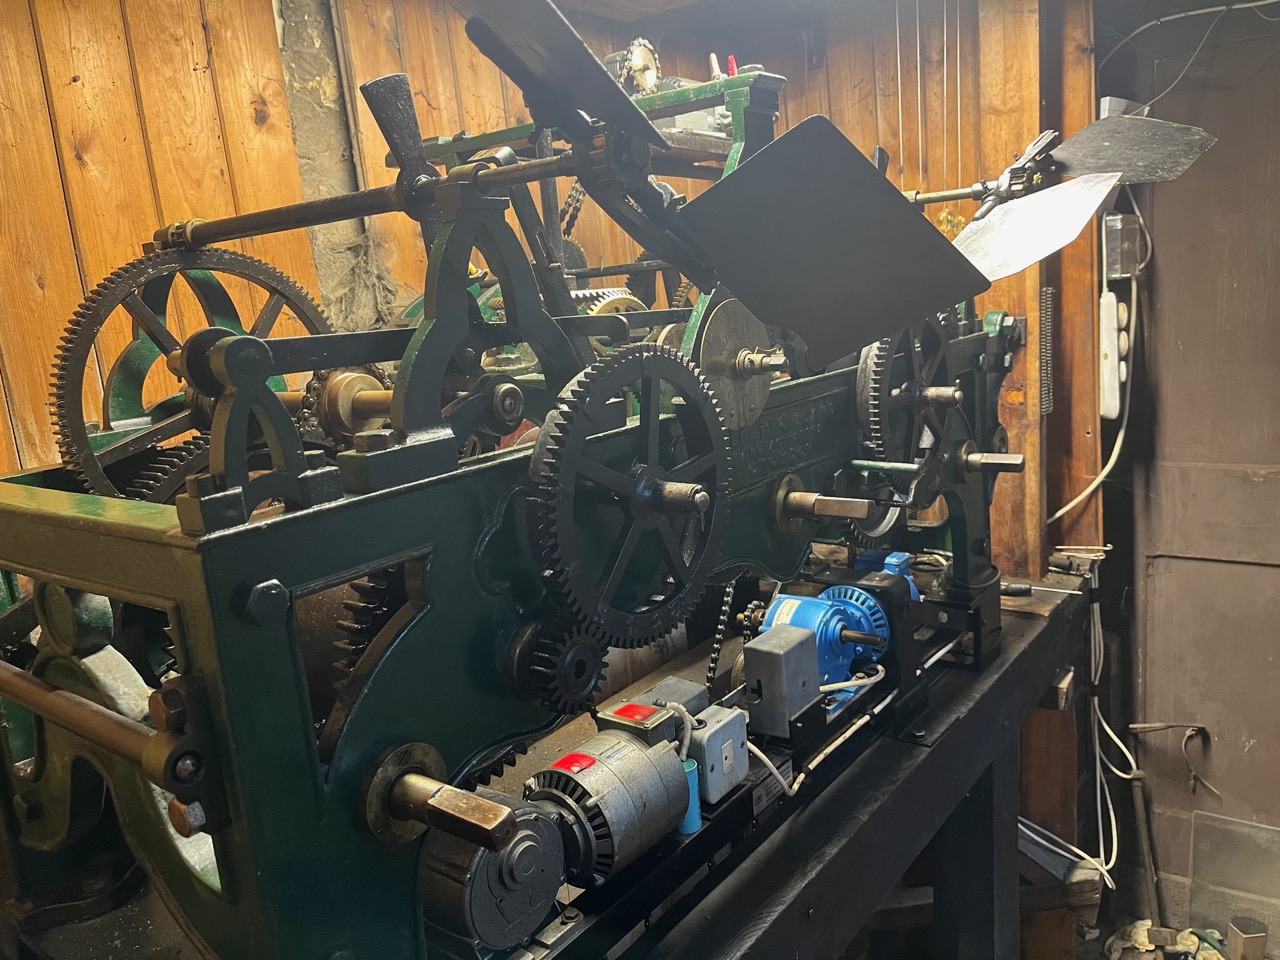
- Look at the clock first. The dial labelled “F” in the picture below displays the time as minutes past the hour. But be careful – the hand moves anti-clockwise. It should agree with the position of the minutes hand on the external clock dials.
Shafts “A”, “B” and “C” were used to wind the clock and the hour and quarter chimes. They are no longer used. Instead the chimes are electrically wound by the motors below “D” and “E”, and the clock by a third motor on top of the clock.
Wheels “D” and “E” control the hour and quarter chimes respectively: they only move when the chimes are triggered (which happens even if the chime hammers have been disengaged).
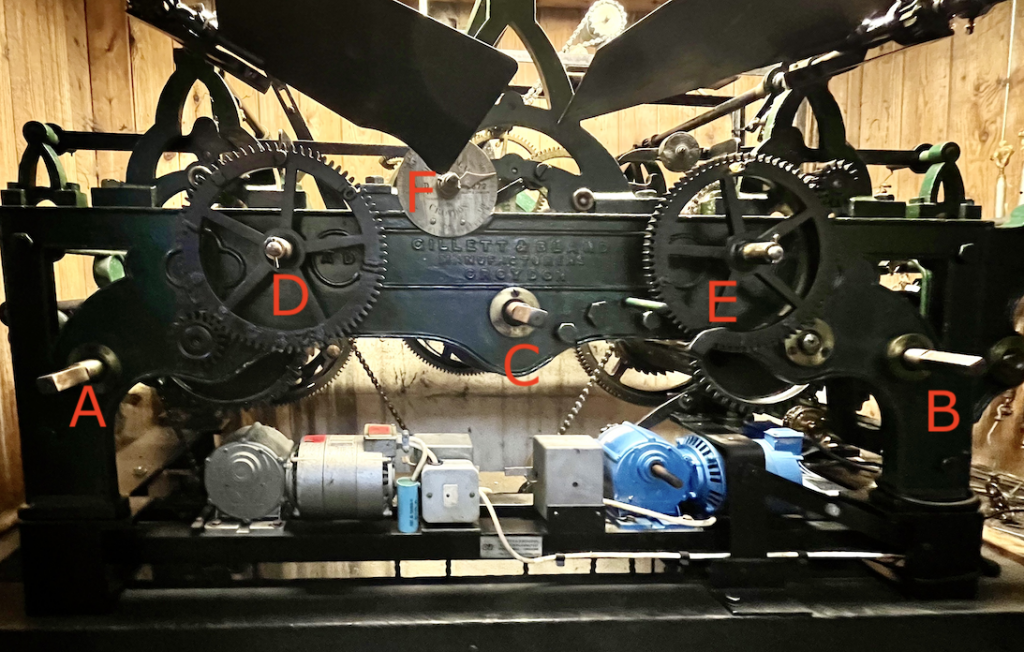
- The clock controller is mounted on the wall beyond the clock itself. Walk past the clock, being careful to keep away from the two paddles (or vanes) on the front of the mechanism. These will turn rapidly when the clock chimes (even if you have disengaged the chiming hammers themselves) and you don’t want your head or fingers in the way.

A screwdriver is usually kept on top of the control unit, but it may have been placed elsewhere, such as on the wooden shelf on which the clock sits. Use it to unscrew the captive screws at the corners of the transparent front cover of the unit. Remove the cover and place it and the screwdriver on the shelf. - The control knob has four positions:
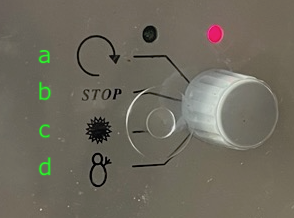
These are:- Fast forward
- Stop
- Summer time operation (the image is presumably a sun)
- Winter time operation (the image is presumably a snowman)
On this clock there is no difference between the summer and winter time settings: the clock automatically adjusts without any need to switch. In normal operation the switch is positioned to setting [c].
Setting [b] “Stop” is self-explanatory: turning the knob to this position stops the clock.
Setting [a] “Fast forward” is used to advance the clock. It causes the hands to advance one minute every 6 seconds, i.e., 10× normal speed. - Think about how much you need to advance the clock. If it’s only a few minutes you can count each minute advanced and be ready to turn the control knob back to setting [c] immediately. But if it is more than, say, 10 minutes, think about how many real-time minutes you are going to leave it advancing for. Remember that it will advance by 1 minute every 6 seconds, or 10 clock-face minutes every real-time minute – that’s a clock-face hour in 6 real-time minutes.
- Turn the control knob to position [a] – fast forward.
You can check how it’s going by observing the minutes pointer on dial “F”, but this won’t tell you the hour.
If someone is watching the clock from outside the church for you then you can phone them and liaise on progress.
If the chimes are correctly synchronized with the clock then you can look at the hour dial “D”. This too moves anti-clockwise, and the lever sits in the slot of the last hour to chime: in other words, if the lever is in slot “5” then it is between 5 and 6 of the clock.
The chimes mechanism will play every time the clock mechanism reaches a quarter – that is, every 90 seconds in real time. And every fourth quarter the hour mechanism will move too. So it’s important to keep out of the way of the vanes, as these will spin every time the clock chimes. All this applies even if the actual chiming hammers have been disengaged. - When the clock has reached the correct time, turn the control knob back to position [c] summer time operation (even if it isn’t summertime).
- Place the cover back on the controller and screw it in position. Place the screwdriver safely on top of the control box.
- Turn off the light, close the door behind you and descend the tower – see here.

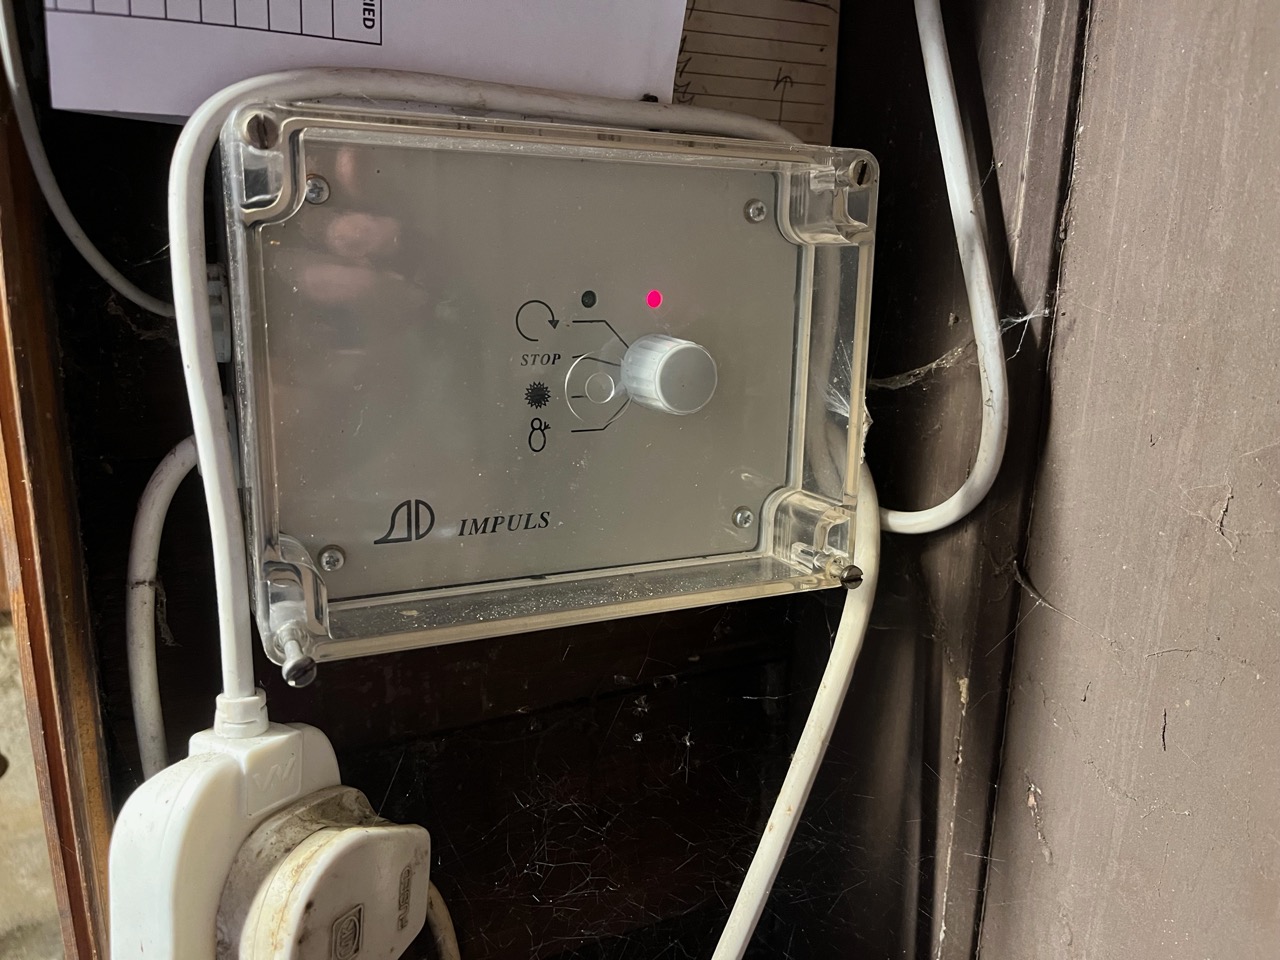
Be careful with the clock controller knob. It can be turned too far and the pointer is then out of sync with where the knob actually is. And you’ll then have work out where it should be. (You can turn it too far in the opposite direction to get it back, but it’s tricky to know how far! Been there, done that.)
Adjusting the Quarter Chimes
 The quarter chimes are controlled by dial “E”. It has four indents or slots cut into the perimeter at irregular intervals. The slots are labelled clockwise “1”, “2”, “3” and “4”. A lever above the dial sits in one of the slots. At each quarter another lever is released that raises the first lever out of the slot. This lever in turn releases the drum that turns and causes the wires to the chiming hammers to move up and down which in turn causes the chiming hammers to strike the bells. At the same time the dial turns anti-clockwise until the lever falls down into the next slot. The dial stops turning, the drum stops turning and the chimes cease. The clever bit is that the distance from one slot to the next, and the speed at which the dial turns, mean there is just the amount of time needed for one of the four quarters to chime. So there is a small gap from “4” to “1”, which chimes the first quarter; a longer gap from “1” to “2” which chimes the second quarter; a longer gap again from “2” to “3” to chime the third quarter; and the longest gap from “3” to “4” to chime the fourth quarter, before the hour chime.
Advancing the chimes requires very quick work because as soon as the mechanism starts then the vanes, which are driven indirectly by the turning dial, also turn. So you need to get your hand out of the way very quickly.
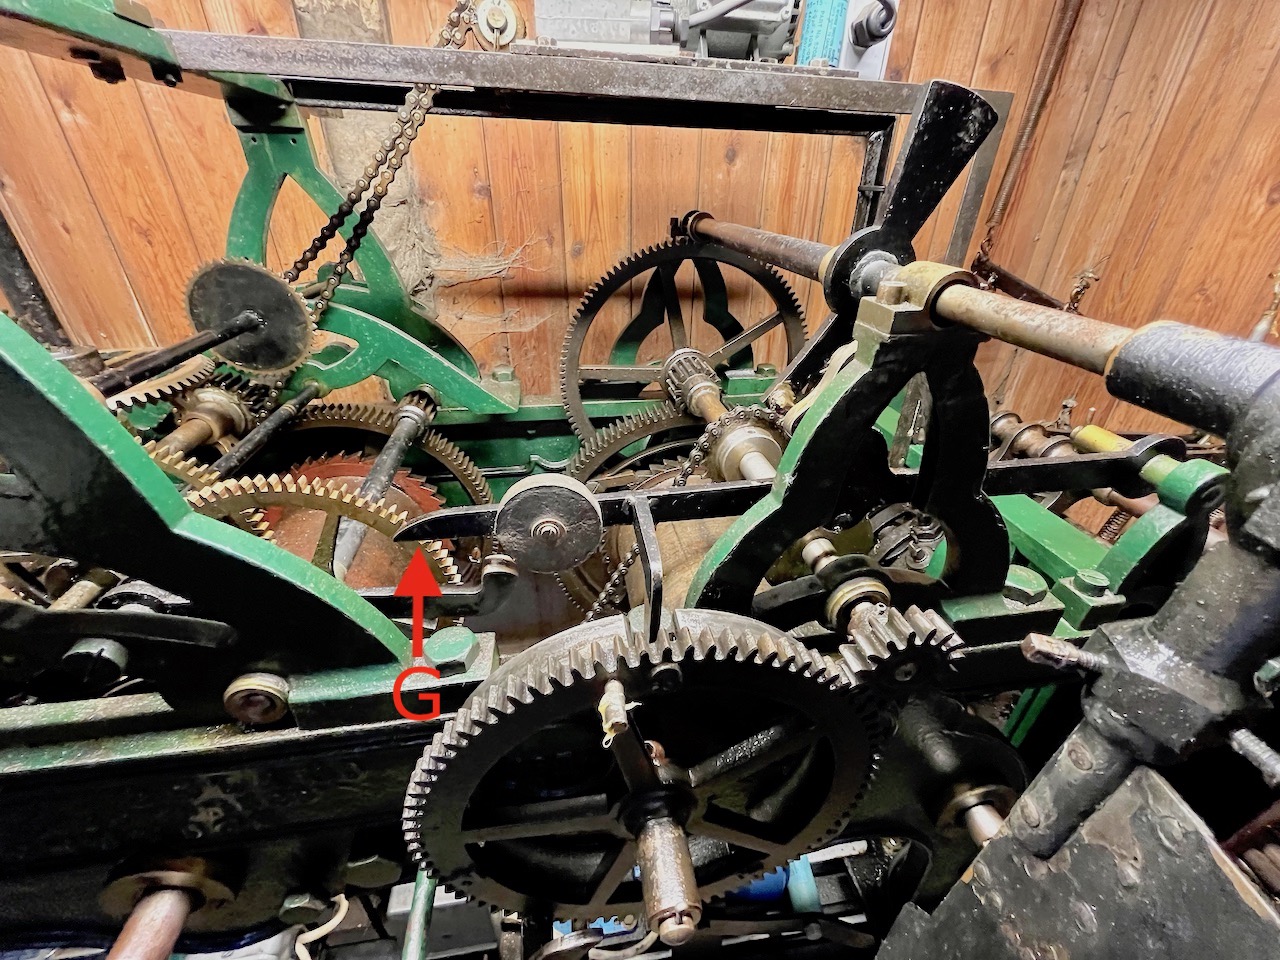
This picture shows the clock from above looking down. What you need to do is to lift the lever at point “G” marked with the red arrow. It only needs to be lifted about ¼″ – then get your hand out of the way of the vanes. The mechanism will chime the next quarter. When it has all come to a halt you can repeat to advance to the next quarter; and again a third time if necessary.
When the lever has moved to slot “4” (which if the hammers are engaged will chime the fourth quarter) this activates the hour chimes, so if you need to advance past “4” you should wait for the hour mechanism (and its vanes) to stop before continuing to the next quarter.
Adjusting the Hour Chimes
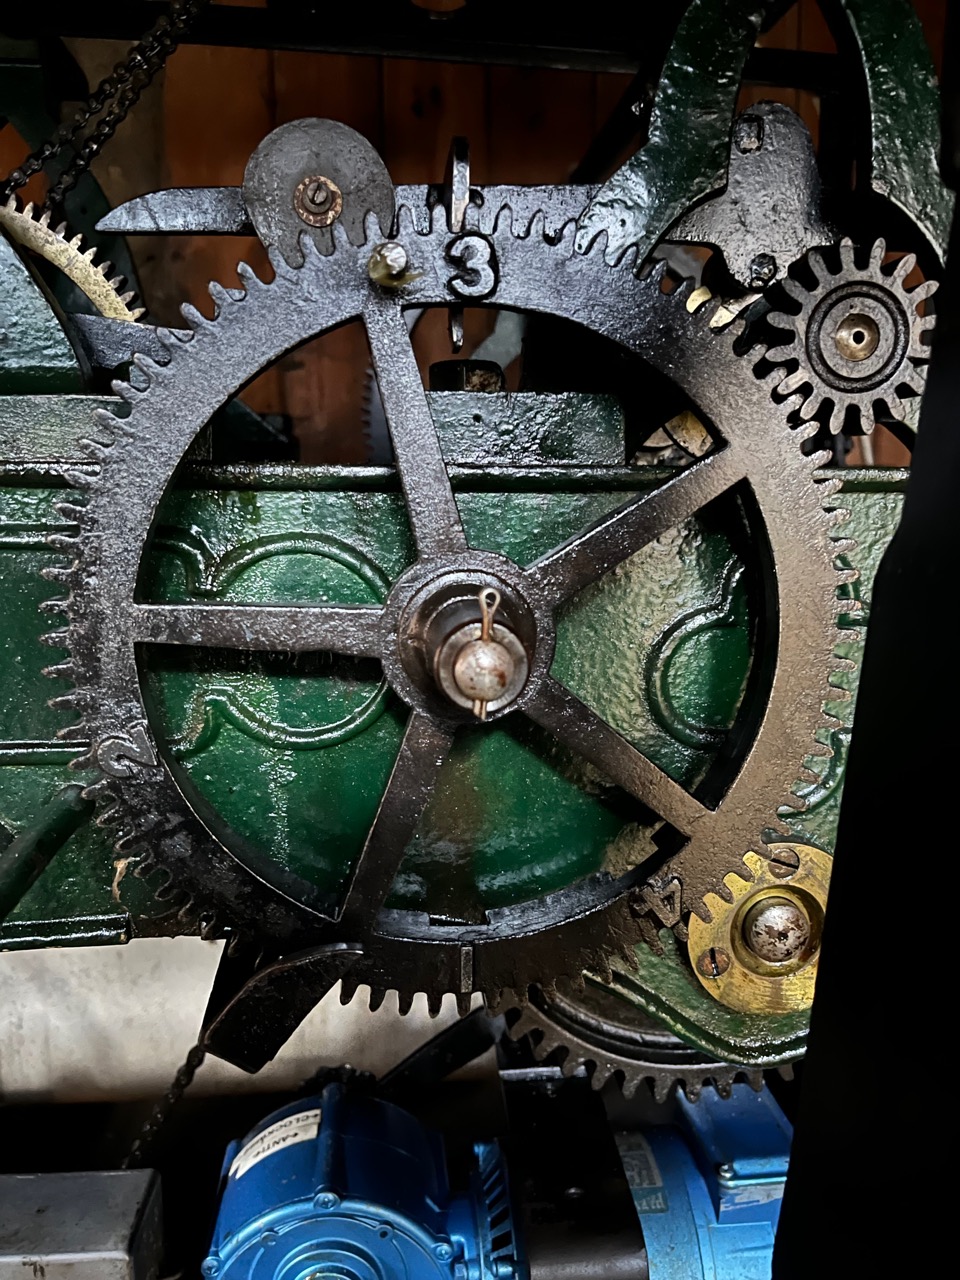
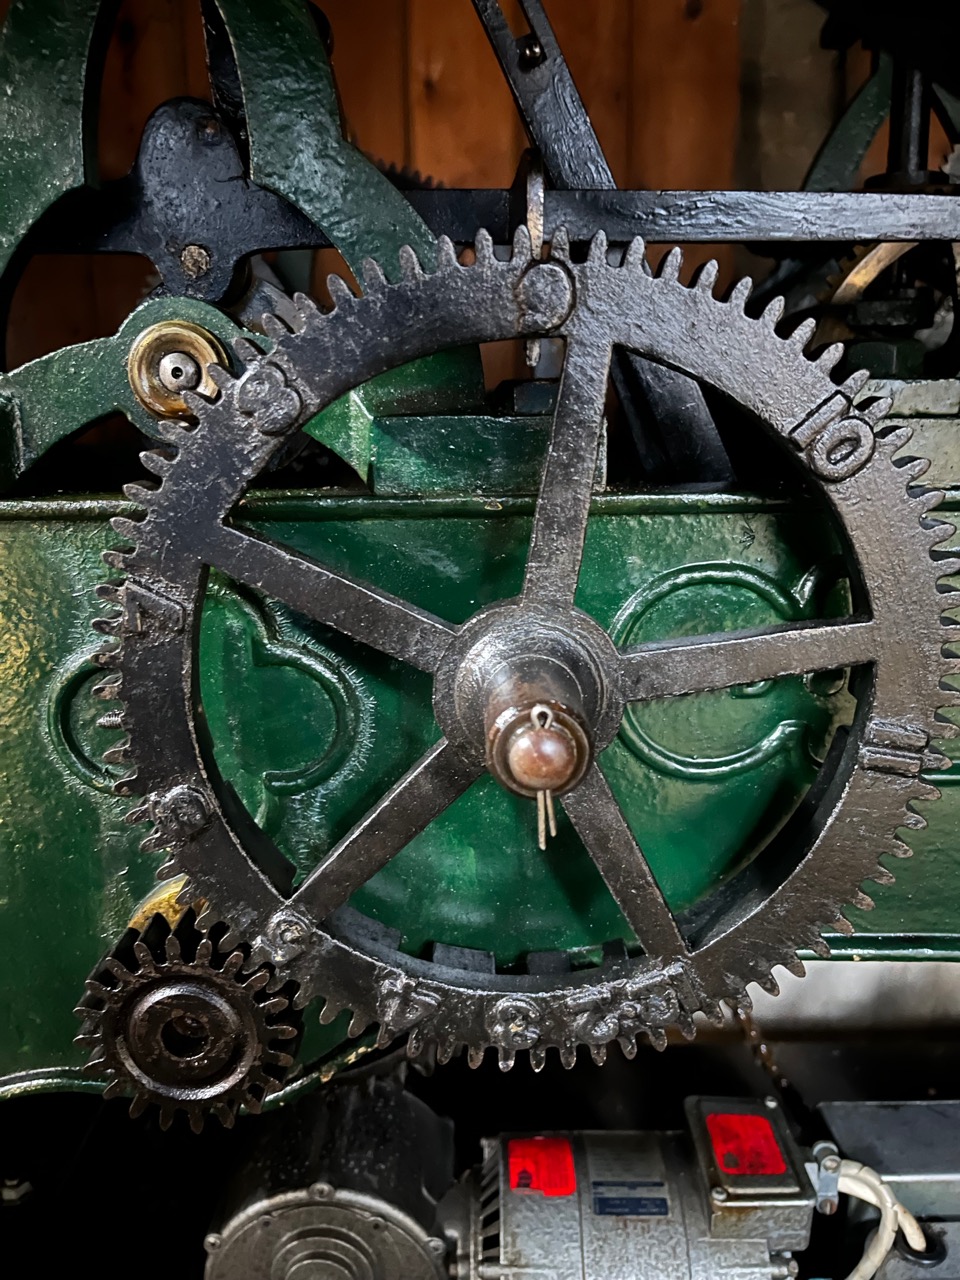 The hour chimes are controlled by dial “D” at the left of the clock. This dial has 12 numbered slots, labelled clockwise “1” through to “12”. The lever sits in the slot of the last chimed hour, e.g., once it has chimed 10:00 until it starts to chime 11:00 it sits in the slot labelled “10”. In this picture the clock has chimed 9, and will chime 10 next time. As with the quarter chimes the gap between each slot is proportional to the time that it takes to chime the corresponding hour.
Adjusting the hour chimes is similar to adjusting the quarter chimes. However, the mechanism will not operate unless the quarter-chime dial is at position “4”. Once the quarter-chime dial is at position “4” then you can keep advancing the hour chimes, hour by hour, until you reach the correct hour.
So the process for adjusting the hour chimes is:
- Advance the quarter-chime dial to position “4”
- Advance the hours dial to the correct hour
- Advance the quarter-chime dial to the correct quarter
In each case “correct” means whatever should have chimed last. So if the time is currently 2:51, the hours dial should be at slot “2” and the quarters dial at slot “3”.
The hours chimes are advanced by lifting lever “H” at the point shown by the arrow, below. As with the quarter chimes, it only needs to be lifted about ¼″ – then get your hand out of the way of the vanes as they chime the next hour.
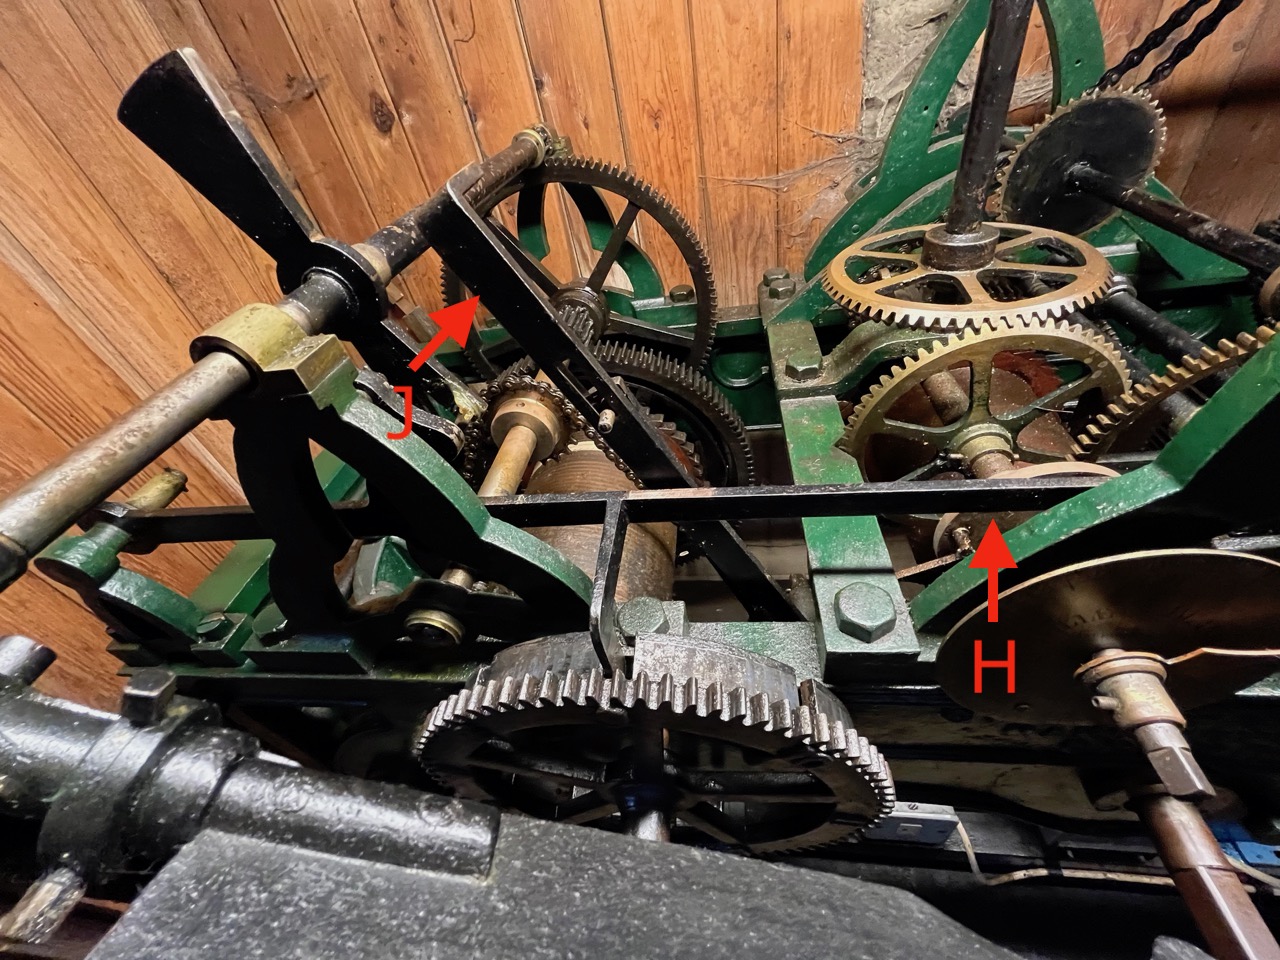
If you are advancing through a number of hours it is possible that the clock will reach the point of chiming the next quarter, which wll move the quarter-chimes dial from slot “4” round to “1”. If that happens then you will need to advance the quarters another three times to get them back to slot “4” before you can continue advancing the hour chimes again.
[To be confirmed: Lever “J” controls when the hour chimes sound – it is responsible for lifting lever “H” out of its slot. By moving it upwards at the point indicated the hour chimes can be advanced even if the quarter chimes are not at position “4”. This has not been checked.]
If the Chimes are Jammed
It has been known for the chiming mechanism to become jammed so that the chimes do not run even when the hammers are engaged. When this happens the quarter and hour dials get out of sync, perhaps implying that the triggering mechanism has jammed, but the exact cause has not been determined. It is necessary first to get the chimes working again and then to advance the quarter and hour dials to the correct position. The concern in this section is to get the chimes working – synchronising the chimes to the correct time is covered above.
When this problem has occurred it has been associated with re-engaging the chimes hammers, though this may not be the primary cause. The quarter-chime hammers are controlled by lever “K” at the right of the clock. In this picture it is shown with the hammers engaged. Pulling the cable in the church onto the lower hook pulls this lever down. In turn this pushes down the four levers below it (labelled “L”) and prevents them from moving. Each of these “L” levers controls one of the chiming hammers of the quarter chimes. By pushing them down, the hammers are moved away from the bells, and the clock end of the levers is disengaged from the drum that specifies the pattern of chimes (i.e., which bell is struck when).

The problem can sometimes be fixed from the ground floor by pulling the quarter-chime cable firmly down as far as it will go, and then releasing it. This may cause the chimes to sound. If a partial chime sounds (some notes missing) then repeat the process until each note has sounded. Wait for the next quarter to hear if the problem is fixed.
Otherwise further intervention at the clock may help. This time, in the clock room manually push lever “K” down firmly onto the lower four levers and then release it. Again, this may cause the chimes to sound. As this can only be done when the chimes are engaged, it is not possible to silence them for this operation.
Once the mechanism is unjammed the chimes can be set to the correct position: see above. To do this you will want to disengage the chimes: it is helpful to phone someone on the ground floor of the church to do this – otherwise you will have to climb all the way down and then back up.
If this does not unjam the chimes then you will need to call out the clock engineer. See below for contact details.
Disengaging and Engaging the Clock Chime Hammers
The chime hammers must be disengaged before the bells are raised for ringing and should be re-engaged once the bells have been lowered. Failing to disengage the chimes before ringing the bells can result in serious damage to the bells which can cost many thousands of pounds to repair.
The chimes are usually disengaged for services and should be re-engaged after the service.
The chimes should be disengaged if the clock is wrong or if the chiming is otherwise awry – chiming at the wrong time is an inconvenience, and it is a nuisance to the neighbours.
The chimes should be disengaged before advancing the time on the clock, or before advancing the chimes, including the hour chimes.
The chimes are disengaged and engaged by means of cables that descend from the bell tower to hooks on the left and right side of the west door.
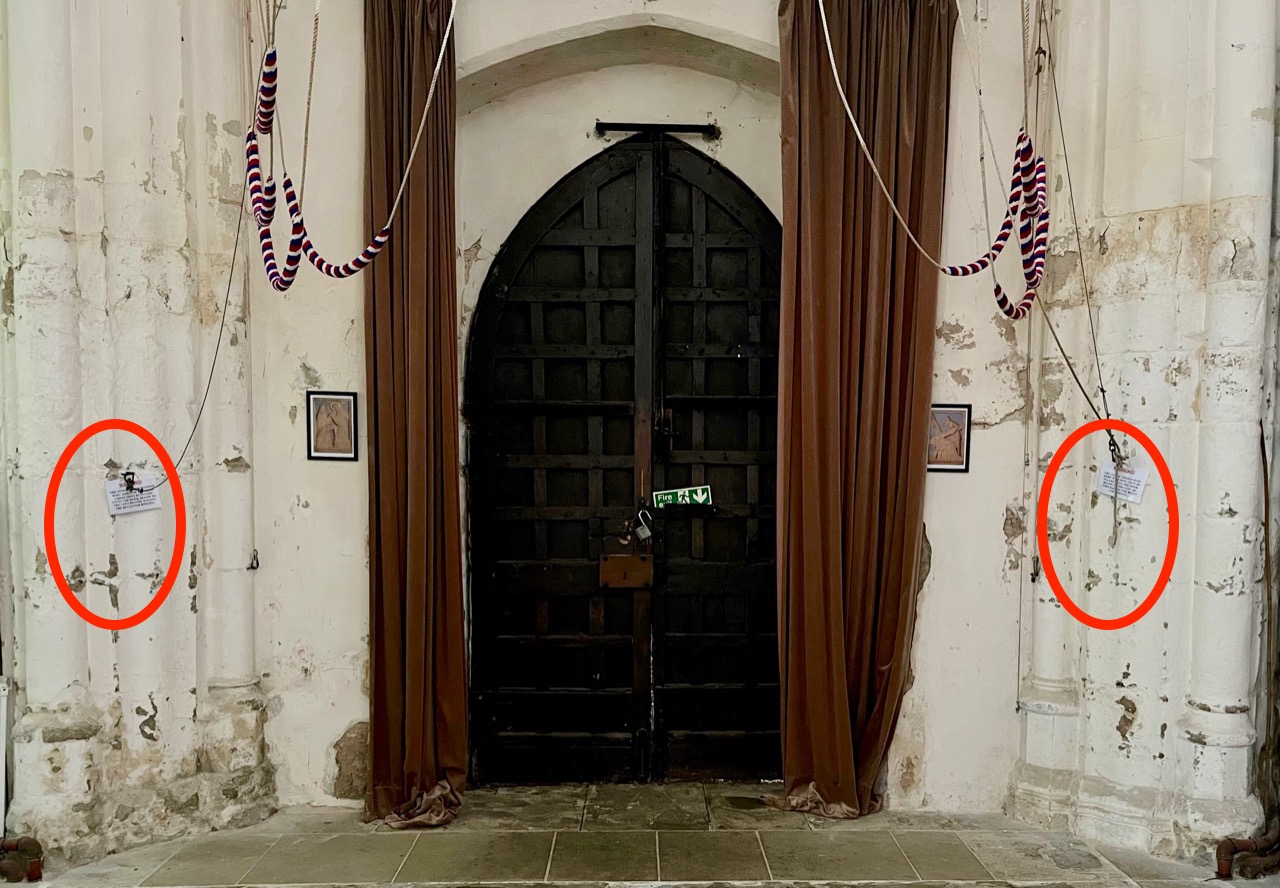
The hour chimes are controlled by the cable on the southerly side (to the left as you look at the west door from inside the church), and the quarter chimes by the cable on the northerly side (to the right as you look at the door). Each cable ends in a small ring; to disengage the chimes the ring must be removed from the upper hook and pulled down onto the lower hook so that the cable is taut. The cable on the hour side is a particularly tight fit and requires some strength to pull it onto or off the lower hook.
When removing the ring from the lower hook to re-engage the chimes it is best to pull the ring down and hold it taut for a moment before very gently slackening it while still feeling the weight, and putting on the upper hook. Otherwise you are likely to cause the clock hammers to hit the bells.
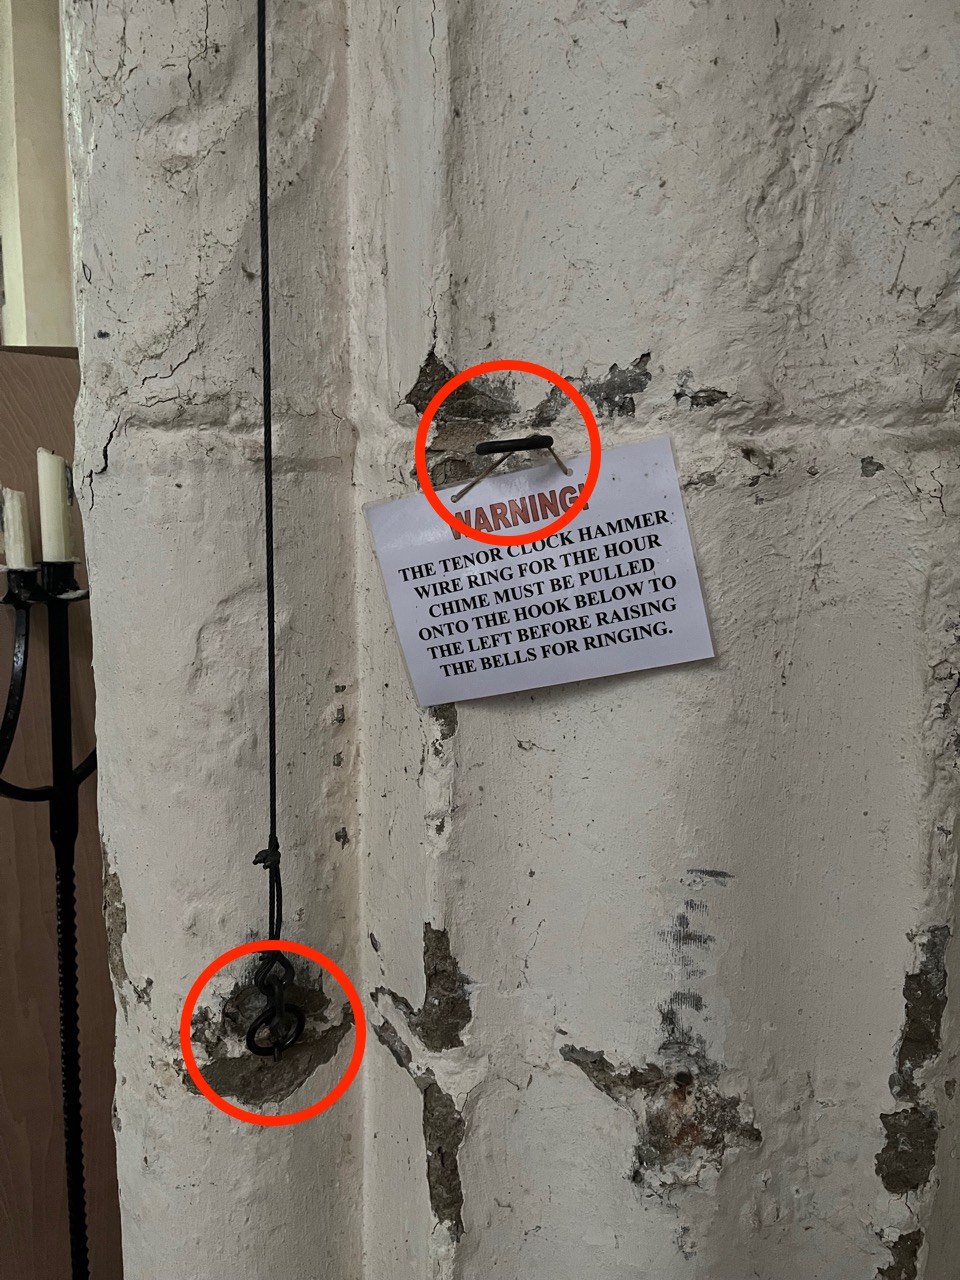 The cable for the hour chimes, shown in the lower position, so the chimes are disengaged. |
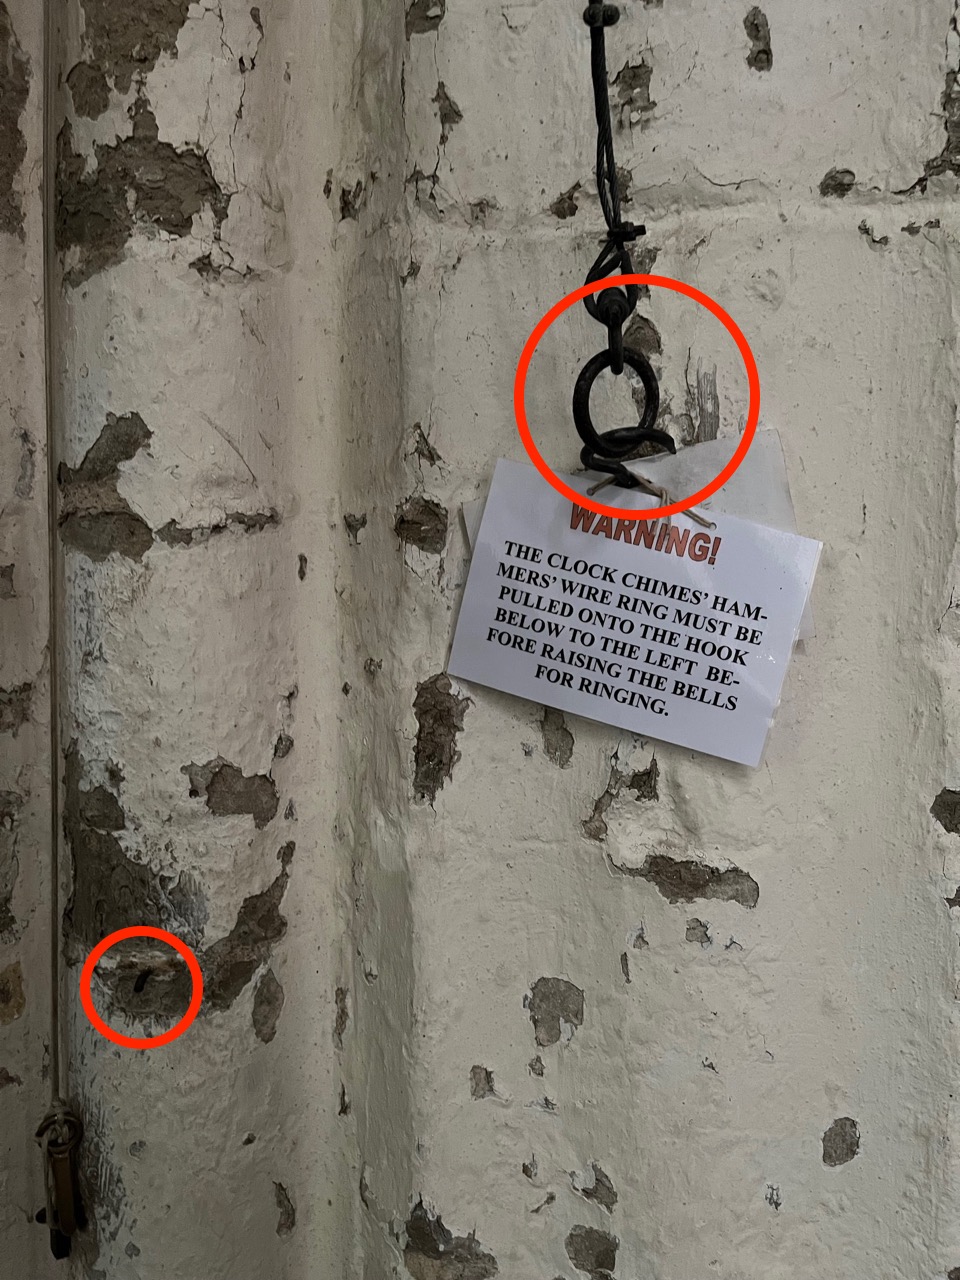 The cable for the quarter chimes, shown in the upper position, so the chimes are engaged. |
What pulling the cables onto the lower hooks actually does is to pull the chiming hammers away from the bells, so that when the chimes operate they hit thin air rather than the outside of their respective bells. The actual chiming mechanism continues to operate.
The rope for the chiming bell (the call bell or sanctus bell) is usually tied to the same upper hook as the ring for the quarter chimes so you will need to remove that first when disengaging or engaging the quarter chime hammers. and retie it afterwards.
The Tower Light
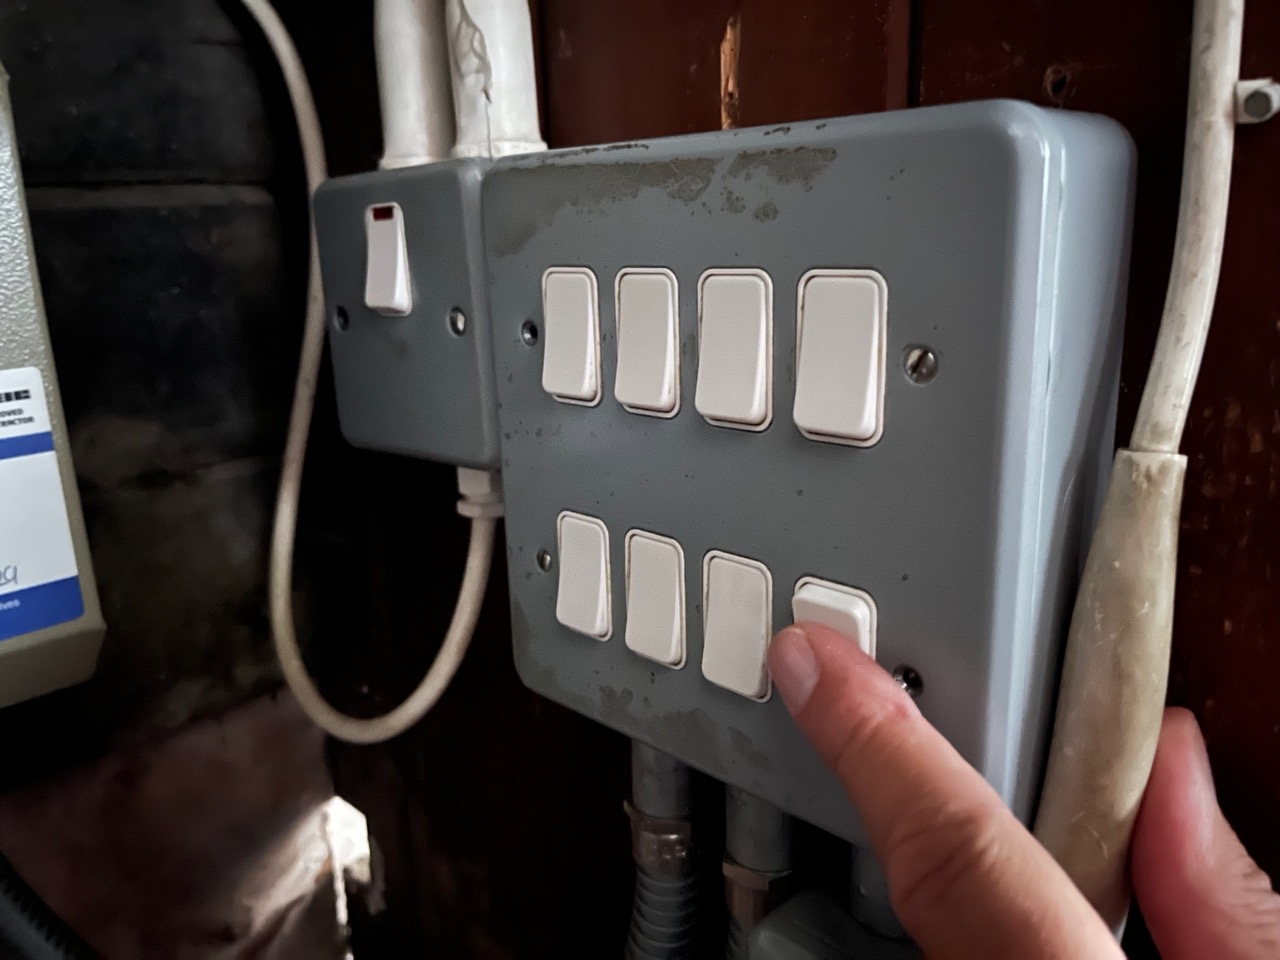
There is a light at the top of the spiral staircase, one in the bell chamber, another on the spiral stair that leads up to the clock room, and there is also a light in the clock room. The first three of these are controlled by a single switch at ground level, so you will need to turn it on before climbing up the tower – and remember to turn it off when you have come back down.
The switch is in the cupboard at the north-west of the church, just to the right of the spiral staircase. The switches also control all the lights in the nave, so be careful! The switch for the tower light is at the front of the lower row of switches. If you look up you should see the light at the top of the spiral staircase coming on or going off as you flick the switch, though there is a short delay.
Getting to the Clock Room
The clock mechanism is housed in a wooden shelter at the top of the tower, above the bells, at the level of the louvres. It looks a bit like a small garden shed. Access is up the iron spiral stair, through the bell chamber, up a second, inner, stone spiral stair, and along a wooden walkway. All open paths have a handrail, so this is not particularly dangerous, just a rather strenuous climb.
You may well brush into cobwebs, which can be a bit disconcerting – don’t allow this to make you lose your footing.
Remember: you should never enter the bell chamber if the bells are up for ringing.
- Turn on the tower light – see here.
- Take your phone and a torch.
- Take the bell chamber key; you will need it at the top of the spiral stair, so keep it somewhere safe (you don’t want to drop it!) and easy to access.
- Unclip the netting at the bottom of the staircase.
- Climb up the staircase.
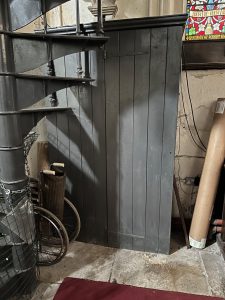
- Unlock the bell chamber door, remove the key, enter the chamber and shut the door.
- Remove the beam holding shut the door to the upper stair and open the door.
- Turn on your torch and climb the stone stair. Mind your head!
- At the top of the stairs go along the wooden walkway to the clock room.
- Open the door and go in.
- There is a light switch to your right, just inside the door.
Leaving the clock room is the same in the opposite order.
- Turn off the light and close the door on your way out.
- There is one “dark” turn on the stone stair so it is helpful to turn your torch on before descending. And there is one step where there is significantly less headroom – mind your head!
- In the bell chamber, close the door behind you and put the wooden prop back against it to keep it closed.
- Open the bell chamber door and put the key in the lock.
- Exit the bell chamber, close the door and lock it.
- Descend the iron stairs.
- Replace the netting around the base of the stair.
- Turn off the tower light.
- Return the bell chamber key to its proper place.
Some History
The clock has a cast iron flatbed frame design, and is painted in the traditional Gillet & Johnston colour of bright green. Dial “F” on the front of the clock mechanism records that the clock was installed, by Gillett & Bland, in 1872. In March 1918 an aeroplane of the Royal Flying Corps collided with the spire. The pilot was killed and considerable damage was done. The bells were not rehung until September 1930, after the completion of restoration of the fabric. Dial “F” records that the clock was also restored in 1930, perhaps to adapt it to the new, lower, position of the bells in the tower. The clock may also have needed repairs from damage caused by falling masonry in 1918.
The clock was a pendulum clock, and the clock and the chimes were powered by the fall of weights, and it was necessary to periodically raise these weights back up to the clock.
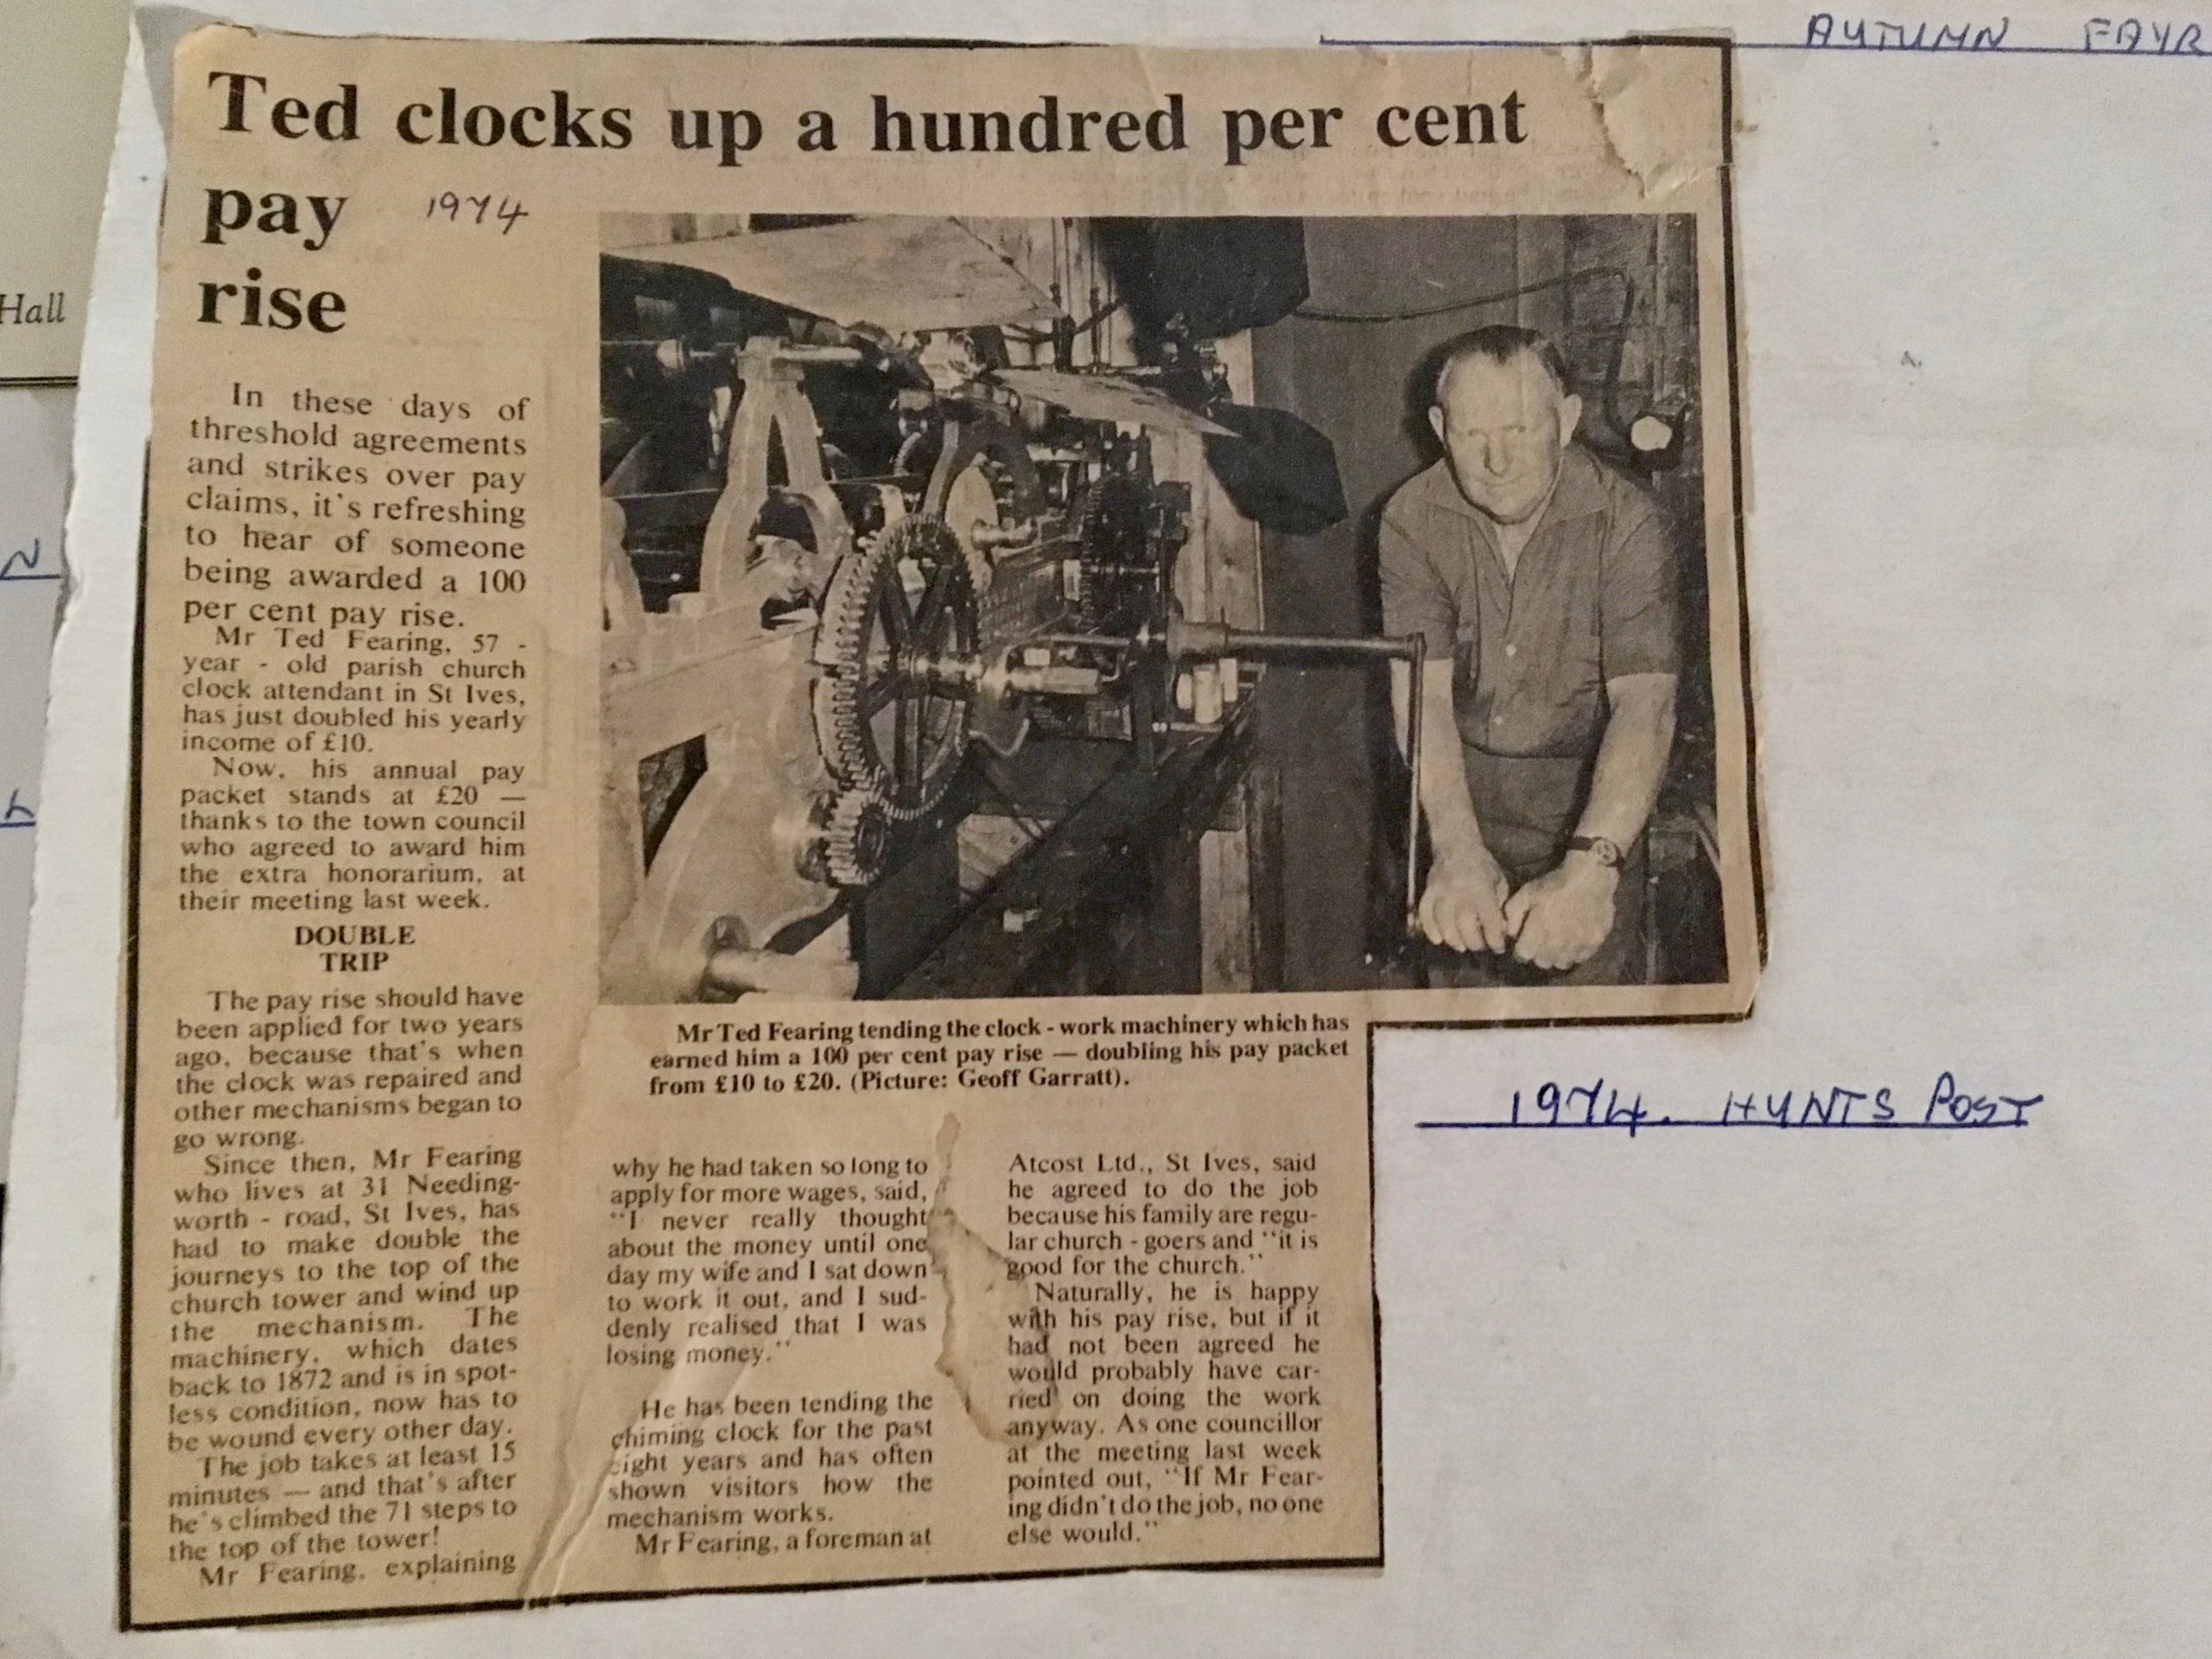
Until about 1990, the clock was wound by hand and required winding at least weekly. For many years this was done after the main Sunday service by Ted Fearing (1917–2002). When Ted decided he was no longer able to climb the tower to wind the clock and chimes, St Ives Town Council funded its conversion to electric winding. The clock weights were left in the bell chamber. At the same time or slightly later, the regulation was changed from a pendulum to radio control (originally broadcast from Rugby, now NPL at Anthorn in Cumbria).
The Chimes
The quarter chimes play the tune commonly called the Westminster Chimes (because it is played by the clock in the Elizabeth Tower of the Houses of Parliament or Palace of Westminster) or sometimes as the Cambridge Chimes (because it originated at Great St Mary’s Church in Cambridge). The tune consists of five four-note parts, repeated twice across the four quarters and played on bells 2, 3, 4, and 7 (ti, la, sol, re in the sol-fa system; or B, A, G and D if the bells were in the key of C major, which they aren’t – they are in G major). The hours are chimed by the tenor bell, number 8, (doh).
Part 1: 2 3 4 7
Part 2: 4 2 3 7
Part 3: 4 3 2 4
Part 4: 2 4 3 7
Part 5: 7 3 2 4
These are played across the four quarters like this:
First quarter: Part 1
|
|
|
| Second quarter: Parts 2 and 3 | |
|
|
|
| Third quarter: Parts 4, 5 and 1 | |
|
|
|
| Fourth quarter: Parts 2, 3, 4 and 5 | |
|
|
|
| The chimes of the hour are played on the tenor bell: | |
|
|
|
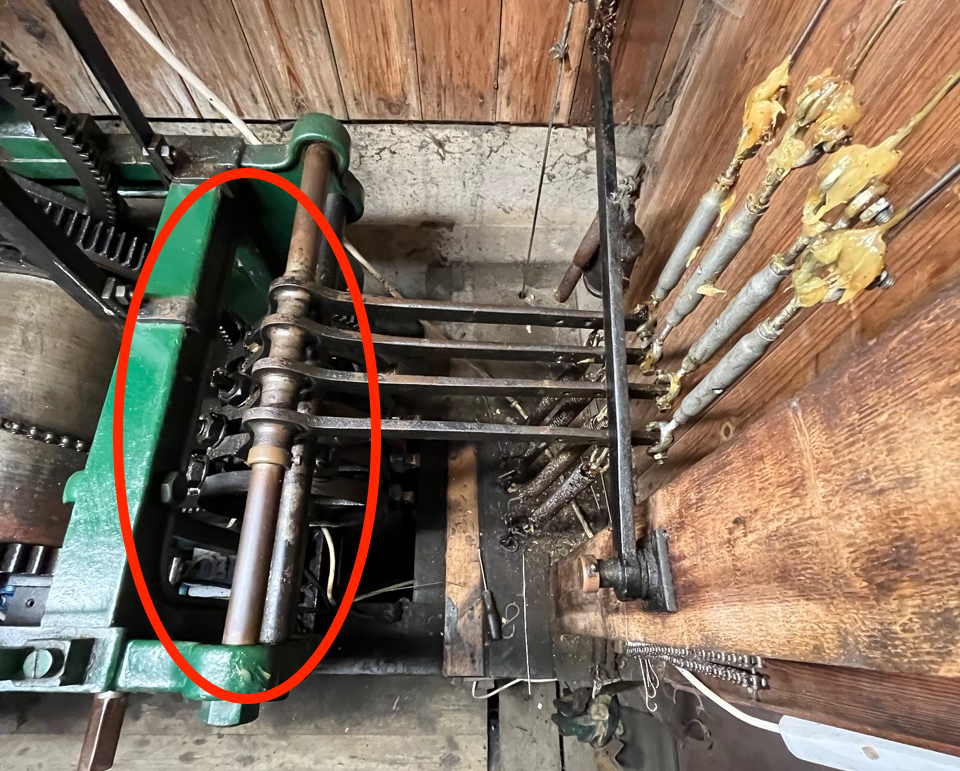
The chimes are played via a drum that traces out parts 1 to 5 in order, and by the gaps between the slots in dial “E” which control how long the drum turns for. In this picture, taken from above the clock, the drum is below the bar indicated. The bar is a pivot for the levers which follow the pattern on the drum and transmit it to the wires at the right which cause the hammers to strike the bells.
If the chime tunes are out of sync so that the wrong parts are played then the clock engineer will be needed.
Contact Details
The clock, chimes and bells belong to the church, and legal responsibility for them lies with the vicar and churchwardens, just as with all other property of the church. The bells may only be rung with the permission (explicit or implicit) of the vicar, and this presumably includes the clock chimes. There is a canonical requirement that a bell is rung before each service.
Day-to-day responsibility for ringing is delegated to the tower captain, who – with the other ringers, particulary the steeple keeper – takes a special interest in routine care and maintenance of the bells. The clock itself does not really fall within this responsibility, but because it involves climbing the tower and knowledge of bells and tower safety, the tower captain or other ringers will often also deal with day-to-day or occasional clock issues.
St Ives Town Council funds the maintenance and service of the clock, including its chimes, as specifically allowed by Section 2 of the Parish Councils Act 1957. If it is thought that the clock or chimes need specialized work by Gillett and Johnston, then the churchwardens or another representative should contact the town council’s Facilities Manager or the Town Clerk. They will liaise with Gillett and Johnston and the church authorities to arrange an appropriate time. Any major non-routine work may need to wait until a subsequent budgetary year.
Remember that any major work to the clock, the chimes, the bells (or anything else in the church) comes under the faculty jurisdiction of the Church and may require a legal faculty or an archdeacon’s certificate. Failing to follow the correct procedure may make you personally liable for the costs, so always consult the vicar and churchwardens before doing any work.
St Ives Parish Church contact page
Tower captain email: bells@stivesparishchurch.org.uk
St Ives Town Council contact page
Gillett and Johnston contact page
For further information on conservation, there is a page on Turret Clocks at the Church of England website.
Disclaimer
This guide has been written by the tower captain at St Ives, Cambridgeshire, based on his experiences with the clock in that church.
Although it is written with the best intentions, neither the tower captain, nor the vicar and churchwardens of St Ives Parish Church, nor St Ives Town Council, accept any responsibility for mistakes, nor for any differences with any other clock, nor for failure to follow necessary local safety measures.
You are welcome to use this as a guide, and to adapt it for your own use, but you should satisfy yourself that you are doing the right thing and acting safely and legally.
Simon Kershaw
tower captain, St Ives, Cambridgeshire
September 2024